A seller on eBay offered a used Hohner Super Chromonica 270/48 for sale, without realizing the comb had a crack, which showed on the base of the comb, and the seller neither presented a picture with the crack, nor mentioned any defect in the item description, and in answer to a question, even gave assurance the harmonica looks and sounds great. After the sale and informed of the undeclared defect all my payments were refunded and the seller left me the harp to keep.
The crack
The crack in the comb is not obvious even if a cut at the back of the harmonica shows as in the picture below:

I needed to take off the mouthpiece and slider assembly to find out if the cut above is confined to the lamination, or if the comb itself is damage. And here is the crack which shows on the third hole:

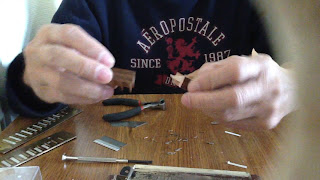
Taking the comb assembly apart
Given the nature of the crack it is necessary to dismantle the harmonica, which means taking off the nails, a very delicate and difficult task. Below is a video showing how I took the harmonica apart:
The comb separates in two sections as soon as the reeds plates are unfastened.
If the two sections are joined at the point of cut the smaller half angles slightly upward.


If the two sections are joined at the point of cut the smaller half angles slightly upward.

if the two sections are laid flat on their base a gap at the top of third hole as wide as 1/8" shows.

It seems to me the comb is badly damaged beyond repair.
Options at restoration
Two alternatives are open. First, join the two halves using the base as reckoning point and fill the resulting gap at the third hole with filler wood. If I do this, the third hole will probably be wider by 1/8" and most likely the 4th hole all the way up to the 12th will move slightly out of position viewed from the mouthpiece. Second, use the cut as reckoning point and join the two halves there without regard to the effect on alignment. This option will make the smaller half slightly angle upwards and protrude out of the reeds plate and will throw off the mouthpiece and slider assembly out of position.
Two alternatives are open. First, join the two halves using the base as reckoning point and fill the resulting gap at the third hole with filler wood. If I do this, the third hole will probably be wider by 1/8" and most likely the 4th hole all the way up to the 12th will move slightly out of position viewed from the mouthpiece. Second, use the cut as reckoning point and join the two halves there without regard to the effect on alignment. This option will make the smaller half slightly angle upwards and protrude out of the reeds plate and will throw off the mouthpiece and slider assembly out of position.
I took the second option - glue the two pieces together following the match-fit at the cut on the third hole and deal with the resulting misalignment.
I thought perhaps the procedure of correcting a warped wood by heating it wet can be applied to correct the problem. The procedure involves wetting the area of the warp, positioning it in such a way that the base lies on a very flat surface; another flat object is placed on top serving as weight and a small heater slowly drying up the comb. I was not sure if this would work, or if it would further aggravate the problem, because the weight might reopen the old crack or new cracks might develop, or the heat might actually warp the comb out of proportion.
Using heat and weights
Here is the picture of my initial attempt to correct the misalignment by applying the water, heat and weights solution:

As seen in the above picture the comb is set on a flat surface with weights placed on top of it, and on the side is a small heater to dry it up. On the left side is a water sprayer which I used to apply generous amounts of liquid from time to time on the misaligned section of the comb.
A lost comb?
After all the trouble that the comb went through the warp and misalignment worsened as seen in the pictures below:


I eventually abandoned the effort because the comb ended up longer than its original size and the position of the hole of the cover bolt had moved farther away by a few millimeters. The heating procedure had terribly warped the comb and I ended up losing the comb. Or, did I?
Saving the comb
Several days after I stowed it away I revisited the comb to find that the misalignment is not as bad as when I stowed it, although one end still angles upward. But I was encouraged to find that the holes of the reeds plate match the holes in the comb which means the comb has retreated back to its original size.

As I examine the comb a thought came to my mind that if only I could straighten the slant near the third hole I could still use the comb. And considering I had given up the comb for loss I thought there is no harm experimenting with it and even applying extreme measures if that is what is going to restore it.
Before making attempts at correcting the warp and misalignment, I patched up the unnecessary holes of the comb with tips of toothpick. Then I took out the clamps from the tool cabinet and used them on the comb:

I used the clamps to force the warps to align and normalize, progressively tightening the clamps as the comb shows it can take the pressure. I applied this procedure on all sides of the comb.

The solution worked ! I needed only to repair a small slit at the top of the comb at the location of the third hole where the original crack was. I was so happy of the results. The comb is actually restored and has come back to life.
Sealing and waterproofing
The final touch is sealing and waterproofing the comb with Salad Bowl Finish:

I had the comb immersed in the sealing liquid three times for less than a minute each, drying it each time using my small heater and again using clamps to immobilize the comb and prevent any more warp or misalignment. As soon as the comb is completely dried, I had it fanned by the same heater for about half a day to soften up the strong smell as a result of the sealing.

Back into service
As soon as the comb is ready, I gathered the parts together and assemble them into a working harmonica.

The final outcome is a restored, good playing harp previously given up for loss.

That's joyful to read about an old man gave his harmonica a life back :D
ReplyDeleteIs this how you would do it again given the chance? I read elsewhere that you should leave one side attached to the reed plate and tease wood glue into the crack.
ReplyDeleteI have an old chordochometta I'm going to try to restore. I don't want to mess it up.
Is this how you would do it again given the chance? I read elsewhere that you should leave one side attached to the reed plate and tease wood glue into the crack.
ReplyDeleteI have an old chordochometta I'm going to try to restore. I don't want to mess it up.
No, I won't follow this procedure. I learned a better technique which I haven't posted here, but I have it on youtube. Here's the link: https://www.youtube.com/watch?v=RhX-bZqiBnM
ReplyDeleteGood stuff! I used this to fix my deceased fathers 50+ year old 64Chromonica!
ReplyDeleteThank you for giving us the gift of your time and your knowledge. Your information has helped me a lot.
ReplyDeleteThanks for sharing and explaining how you made the necessary repair. Great job!
ReplyDeleteYou have very good knowledge about hair care products write something on best skin care and hair care products at good price
ReplyDelete